Pages

Saturday, 28 November 2015

Supercharged Green Eggs

Day 5 of a 'zucchini recipe a day' brings a simple meal to start the day and with all the good stuff coming from just outside my back/front door. Getting back home this morning from making a new PB at my local Parkrun, this was the perfect way to replenish myself. 

Supercharged Green Eggs

Ingredients

  • 1 tbls butter
  • 1-2 Shallots, sliced (garden)
  • Bunch rainbow chard, chopped (garden)
  • 1 zucchini, grated (garden)
  • small handful basil (garden)
  • 3 eggs (from Trixie)
  • splash of milk
  • 1 tbls flaxseed
  • 1 tbls parmesan
  • salt and pepper
  • sauerkraut to serve (homemade)


Directions

Place pan over medium heat and melt butter. Add all veges and saute for 30 seconds. 


Add combined egg and milk and pour over greens. Cover with a lid and cook for a minute of so until the egg is set. Try not to cook for too long as you want the veges to keep there fresh green colour and flavour.


Serve with a sprinkle of flaxseed and parmesan cheese and a side of home made sauerkraut and eat straight away!!! I had to share with my littlest kidlet, she loves her eggs and sauerkraut!


Friday, 27 November 2015

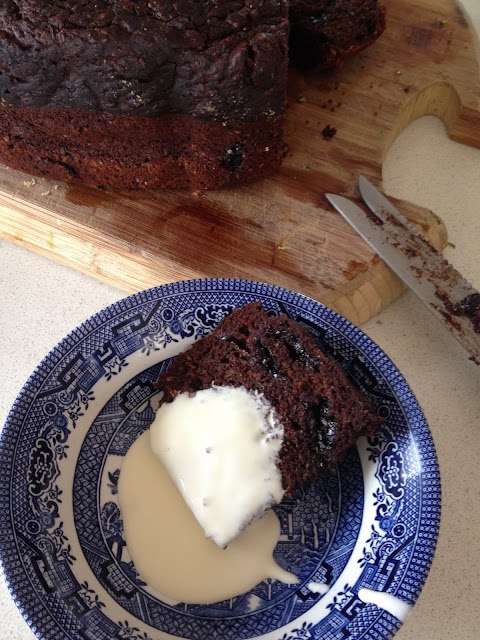
Zucchini Brownie Cake Slice thingy

Another sneaky vegetable cake the wee ones don't realise is actually a pretty healthy treat. All depends on your view as to what is healthy though I guess, but I put this one in the good category. So long as its not eaten for every meal, although I could and would have when I was pregnant and wished I thought of this version then! Again, I baked this in my bread machine so final results will look a little different, taste is still going to be YUM!

Zucchini Brownie Cake/Slice

Ingredients

  • 2 cups zucchini, grated (from my garden)
  • 1/2 cup melted and cooled coconut oil (or very light olive oil)
  • 1/2 cup honey 
  • 2 large eggs, at room temperature
  • 1 teaspoon vanilla extract
  • 1 3/4 cup whole wheat flour
  • 1/2 cup unsweetened cocoa powder
  • 1/2 teaspoon salt
  • 1 1/2 teaspoons baking powder
  • 1/2 teaspoon cinnamon
  • 1/8 teaspoon nutmeg
  • 3/4  cup dark chocolate chips

Directions

Preheat the oven to 180 degrees. Grease a baking/loaf dish. In a large mixing bowl, beat together the coconut oil, eggs, honey and vanilla. Add zucchini. In a separate bowl, combine flour, cocoa, salt, baking powder, cinnamon, and nutmeg. Stir to combine.


Add dry mixture to the wet zucchini mixture. Stir to combine. Add chocolate chips. Pour batter into prepared pan.


Bake 40-45 minutes or until a fork inserted in the center comes out mostly clean. Let cool completely before removing from dish. (In my bread maker it takes about 1.5 hours as its a 'deep' mix baking in the loaf pan.)


Thursday, 26 November 2015

Zucchini Lasagna

Today I bring a dish my little  sister shared with me. I have altered it a bit from her version to suit our family. This recipe makes a double batch, so you can freeze half for another night. As you know my oven is broken so I cooked this slowly in my electric fry pan, pretty good for a backup.

Zucchini Lasagna

Ingredients

  • 3 brown onions, diced
  • 5 garlic cloves, minced (from my garden)
  • 1kg beef mince
  • 1 cup red wine
  • 4 - 5 tins diced tomato ( I used my own homemade diced tomato)
  • 1/2 cup tomato paste
  • fresh or dried herbs like parsley, oregano, rosemary and basil (from my garden)
  • salt and pepper
  • 1 cup ricotta cheese
  • 1 cup sour cream
  • 1 tbls butter
  • 1 tbls plain wholemeal flour
  • 2 cups milk
  • Dried or fresh lasagna sheets
  • 3 large zucchinis, thinly sliced length ways (from my garden)
  • 2 cups grated cheese

Directions

First make a basic tomato/mince sauce. Saute the onion and garlic and herbs until soft. Add the mince and brown off. Pour in red wine and allow it to reduce a little. Add diced tomato, tomato paste and salt and pepper for seasoning, bring to the boil and then reduce heat to very low and simmer until the sauce has reduced right down and is thick. Normally at least an hour.


I then combine ricotta cheese and sour cream and set aside. I also make a white sauce. Melt butter and stir in flour. When combined add milk slowly and whisk until smooth. Salt and pepper to taste. You can add cheese if you like, but it is not necessary.


Once sauces are ready its time to assemble. First start with a thin layer of meat sauce and top with lasagna sheets, then another meat sauce layer, followed by zucchini layer then ricotta sauce, lasagna sheets, meat sauce layer, zucchini layer then white sauce and finished with grated cheese scattered over the top.


Pop into a preheated 200 C oven and bake for a good hour or so and you can easily slice a knife in. Serve hot with a nice salad.


Wednesday, 25 November 2015

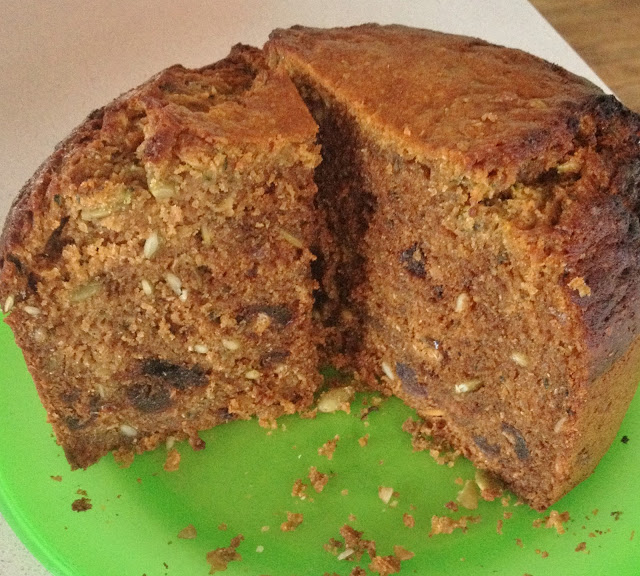
Zucchini Cake

Today's little zucchini delight is a treat for anytime of the day or night. We sneak a slice with a little (ok a lot) of cream and a cuppa tea after the kids have gone to bed. Great for a lunch box snack with a smear of butter too for the kids. None of this beauty is ever wasted!

Zucchini Cake

Ingredients
  • 3/4 cup honey
  • 1 cup olive oil
  • 3 eggs, lightly whisked (from Trixie)
  • 3 cups coarsely grated green zucchini (from my garden)
  • 2 1/2 cups plain wholemeal flour
  • 2 tsp baking powder
  • 1/2 teaspoon bicarbonate of soda
  • 3/4 cup pepita seeds (or any other nut or seed)
  • 1 cup whole dried pitted dates, coarsely chopped
  • 1/2 teaspoon ground cinnamon
  • 1/4 teaspoon ground nutmeg

Directions

Preheat oven to 180°C. Lightly grease a loaf or cake tin.

Use an electric beater to beat together the honey, oil and egg in a large bowl until pale and creamy. Add the zucchini, flour, baking powder, bicarbonate of soda, pepitas, dates, cinnamon and nutmeg, and stir with a wooden spoon until well combined. Pour into the prepared pan.

Bake in oven for 1 1/4 hours or until a skewer inserted into the center of the cake comes out clean. Remove from oven and set aside in the pan for 30 minutes to cool. Turn onto a wire rack to cool completely.

*As my oven is not working at the moment, I baked mine in the bread machine this time round. After all the ingredients were combined I poured into my bread/cake dish and baked for the same time.

Enjoy x


Tuesday, 24 November 2015

Crispy Zucchini Flowers Stuffed with Ricotta and Choc Mint

I'm going to do something a little different this week. As I have so many zucchinis I have decided I am going to post a recipe a day for the next week using the zuc's from my garden - along with anything else I manage to forage for and use. First up I'm using zucchini flowers. There are plenty of different ways to cook the flowers and this one had the kids gobbling them up!

Crispy Zucchini Flowers Stuffed with Ricotta and Choc Mint

Ingredients
  • 300g ricotta cheese (I made my own which I'll share another time)
  • a pinch of ground nutmeg or fresh if you grow it
  • a small handful freshly grated Parmesan
  • 1 lemon, zest finely grated, plus lemon slice for serving
  • a small bunch fresh choc mint, leaves picked and finely chopped (from my garden)
  • 1 to 2 fresh red chilies, halved, seeded and very finely chopped (from my garden)
  • salt and pepper
  • 1 cup plain flour
  • tsp baking powder
  • 1 cup white wine or sparkling water
  • 10 or so zucchini flowers - male or female (from my garden)
  • olive oil

Directions

Mix the ricotta in a bowl with the nutmeg, the Parmesan, lemon zest and most of the chopped mint and chilies. Season carefully, with salt and pepper, to taste.


To make a lovely light batter, put the flour and baking powder into a mixing bowl with a good pinch of salt. Pour in the white wine and whisk until thick and smooth. At this point the consistency of the batter should be like heavy cream or, if you dip your finger in, it should stick to your finger and nicely coat it. If it's too thin, add a bit more flour; if it's too thick, add a little more wine.


Open the zucchini flowers up gently and with a teaspoon, carefully fill each flower with the ricotta mixture until just full. Carefully press the flowers back together around the mixture to seal it in. Then put the flowers aside. 


Get the pan ready for frying and a plate with paper towel for draining then one by one, dip the ricotta-stuffed flowers into the batter, making sure they're completely covered, and gently let any excess drip off. 


Carefully put them into the hot oil. Don't crowd the pan too much otherwise they'll stick together. Fry until golden and crisp all over, then lift them out of the oil and drain on the paper towels. 


Serve with a lemon squeeze or some sweet chili sauce (home recipe of course) and eat immediately while crispy.


Tuesday, 17 November 2015

Zucchini's and more zucchini's

The sun is out today and apparently the next week is going to be a hot one. That's great for our garlic as it hasn't fared so well with all the rain. Luckily we have them in pots so were able to move them under cover but still in the sun. Although one type didn't really survive. Pulling them up we notice most of them are rotting from the sog. Bummer! We really have had pretty perfect rain conditions otherwise and so far I haven't had to do a great deal of watering. It makes me feel really sad for the farmers out there that aren't receiving as much rain as us and their livelihood depends on it. I am loving that each day I am able to go out and forage in my garden for that nights meal and am starting to see a little saving in the amount I am spending at the fruit and veg shop. Even the register chicky commented I didn't have much compared to normal. I felt weirdly guilty when I said I was growing lots in my own garden. Fruit is our big spender there still, the kids happily chomp down on several servings a day! And no I'm not complaining if that's the worst thing they are eating through the day....


Sunflowers.

Potato flowers.

Kholrabi.

Rainbow silverbeet.

I find it interesting that around the home hubby and I seem to have certain 'jobs' that can only be done by one or the other. Pasta making has become hubby's. I tried to make it the first time and totally stuffed it up, so when he made it the next time and it came out perfect he became stuck with that job. Plus the kids like to help and he has so much more patience with it than I do. Whenever we eat it we always comment that we should make it more often as it really is the best kind of pasta. Its the kind you could go back for seconds even thirds its so good and then end up feeling crook for the rest of the night because you ate too much! Luckily this time round only 300g was made, so there wasn't enough for even seconds.


Homemade pasta.

Hubby making pasta.

My oven is not working! Its a real pain in the backside. On the upside I have had to work on new ways of baking things until I work out whats wrong with it and get it fixed, so this has been my learning experience for the week - making do with what I already have. The bread machine makes beautiful cakes and has produced a few lovely zucchini cakes so far. I have also used the slow cooker, but the tops seem a little soggy, so I'm sticking with the bread machine for now. My friend also has a dodgy oven and she is going to try and bake in her new webber bbq. Will be interesting to hear how that goes for her. I really want to bake some cookies, but haven't worked out yet how I will do that. What other alternatives for baking are there, any ideas anyone? 


From the garden.

Zucchini's. On the left are not pollinated and on the right pollinated, all are 4 days old.

I've had a few friends ask about zucchinis and in particular the ones that wont grow. If you have little zuc's that start to shrivel up and rot from the end it normally means it has not been pollinated. If a zucchini has been pollinated it will thrive and be ready to pick in a couple of days. We don't have many bee's and bugs around to do our pollinating so I do it mostly myself. Its pretty simple. All you have to do is pick a male flower (the ones without the baby zucchini), peel the petals away so you are left with the anther covered in pollen, take it and gently brush inside the flower with a baby zucchini on the stigma. Its best to do this first thing in the morning as the flowers start to lose their viability as the day goes on. Then sure enough you will have zuc's popping up everywhere.


The kids cant decide on names for the fish. I think there are about 10 different names floating around with them at the moment, so when it is finally decided I will share. Although the cat that we don't have yet already has a name! I cant wait to get a cat and I am patiently waiting for the right one to come along. We would love to rescue one and as far as DD is concerned it must be a ginger one, so the wait could continue for sometime yet. Anyway, enough to do already and on that note, I better get back to it!

Tuesday, 10 November 2015

Saving seeds and Sharing rooms

After I wrote last week I was struck down with a weird sicky bug. It totally knocked the socks of me. I felt so awful that hubby had to take Thursday off work to help mind the kids. I slept until lunch and still was not myself. At least 4 days of gut wrenching pain, aching bones and no energy. And then hubby was struck down for the whole weekend to top it off too. Thankfully the wee ones somehow managed to not succumb to the nasties that were floating around our home. It was like nothing we (at least hubby - morning sickness takes the cake for me) had experienced before. We have come out the other side now and the light at the end of the sicky tunnel is so nice, warm and fuzzy! It seems a new lease on life has come upon me as I remind myself how bad things can be and to be thankful each day that we have our health. We really do try to sustain a healthy and balanced lifestyle that I wonder how sick we really could have been if we didn't. I don't know how this sicky bug came into our home, but looking on the bright side it definitely gave me a boot up the bum to solidify our healthy ways and to pursue something new. So this week I will challenge myself to incorporate something extra to aid our health and lifestyle.

Our other pets, the fish. Just realised they don't have names. Will have to sort that our when the kids get home....

Chicken Tagine for dinner.

A view of our front yard.
I need (want) a magazine rack.....I suppose I could do without it, but it was really just an excuse to go to the op shops this morning for a squizz. I didn't find a magazine rack but I did manage to come home with 3 bags of bits and pieces. All of which we 'need' of course. I have a slight problem with searching for bargains and as some would say hoarding. I am working on it - its on the to do list. Although if you look at it like I am saving this from landfill and thus protecting our environment then its ok, yeah? I do manage to sort through things - eventually, and give away or sell some goods. However I often find about 2 weeks later I need it or could have put it to use somewhere else around our home. I guess really I just need more storage! Our home is certainly not lacking in 'homely' items, if there is a space I will fill it - kinda like the garden. Somehow I can always think of something that we 'need'. I do my best to make sure I am not succumbing to consumerism and sourcing these items from the unwanted. Also the kidlets love it when they come home and have a 'surprise goody' waiting for them!
Today's scoop from the op shops. See that stick blender I found - $6!

Toys galore....these have been waiting to be sorted out for sometime now, trying to find the motivation.

And clothes galore....again waiting to be sorted, grrrrr.
This year I purchased all my seeds for the garden from a local organic place called Greenpatch. I am going to try and seed save this year and first up will be my zucchini's. They have been providing a plentiful supply so far and one bush I have dedicated to growing my seed zucchini. I believe they take up to 2 months to fully mature and this baby is about 3 weeks old. So far it is about 20cm long , at maturity they can reach up to 50cm long. Normally when their skin is hard and rubbery they are about ready - prick it with your finger nail and if it penetrates its not ready. They are not so good for eating at this stage, but I do remember when I was a kid our Italian friends slow cooking giant zucchinis - I think they are called marrow then, with some sort of filling and it was delish. That is an old memory though from when I was a kid and things always seem bigger when you were little than they actually are!

My seed zucchini.

A lone strawberry.

Hello baby bird.
As I was wandering around this morning taking pictures to share, our resident baby black faced cuckoo shrike poked his little head out to say hello. I believe there to be 3 little babies in there, though its still a bit tricky to see. Their nest is so little I am surprised they all fit in. While our home is a 3 bedroom home I too moved our last baby into share a room with her big sister and brother. They are all still adjusting to the excitement and it was a very early morning for us today - who doesn't love 5am starts??? I am going to have to do some more rearranging though as the littlest monkey has found a way to climb up onto the bed, into the cot then from the cot up to the top bunk! Never a dull moment with her, she loves to climb everything. Pretty sure mum said I was the same as a baby, so I know where she gets it from....So much to look forward to.

Wednesday, 4 November 2015

Nature babies

Besides all the beautiful flowers that are blooming in spring, my other favourite thing about this season is all the new nature babies. We have 2 nests in 2 different trees in our front yard, the Black faced cuckoo shrike and the Australasian fig bird. The 'figgy's' as my DD likes to call them have been nesting in our tree for as long as we have lived here and the cuckoo shrikes for the last 2 seasons. They, along with the magpies provide plenty of entertainment for the wee ones with their fighting (aka protecting their nest/babies). The magpies have been making the most unusual sounds, almost like they our copying our words, I have never heard them make these sounds before. The other babies we have seen most recently were from our visit to Taronga zoo. The chimps in particular were most fascinating. 3 new babies and a whole lot of testosterone getting around. They were crazy! At one stage one threw another into the water. Very loud and very exciting! The zoo was an amazing place though I cant help but feel a little sad seeing them 'kept'. I know some of them know no different and others were 'saved' or whatever the story. I guess sometimes life is like that for some of us too...?

Our resident mummy and daddy Black-faced cuckoo shrikes.

Our side garden.

Our Sydney trip was much better than I expected. I generally prefer to stay where I have everything I need for the wee ones at my fingertips as I am a self proclaimed stress head/control freak! It was nice to get away from everything at home (although I was constantly reminding myself of all the things I would still have to do when I get home) and force myself to relax a little - not so easy to do. My biggest realisation of the getaway was how much we do for ourselves at home. We stayed in a room that didn't have the greatest facilities and thus made it quite difficult to do and eat what we normally would. Plus I didn't have all my bits and bobs at hand. I popped down to the local aldi to get some food/supplies and when you don't have any cooking facilities besides a microwave and kettle at your ready there really wasn't much I could buy, sorry kids - carrots and bananas for 2 days straight! Takeaway (we had Thai one night) was so expensive and tasted ordinary too. I did bring home a packet of biscuits and much to my delight the kids did not like! I do notice with a lot of things now when the wee ones try something that is not made by moi, they just don't like it and ask me "what is this?" with a look of disgust upon their face. Mind you lollies haven't worked their way into that category yet :( 

Third attempt at growing potatoes, so far a success.

Front garden coming along.

More of the front garden.

The garden is really getting a wriggle on now and I am picking 2-3 zucchini's a day, a handful of beans, radish and lettuce for the salads. We have had some amazing rain, which I am so thankful for and feel almost guilty hoping for a couple of days of sunshine now. I cleaned the chookhouse out and put all of their stinky straw over my garden and the rain has mooshed that in nicely too. I think when the sun does eventually show its face again my nicely 'maintained' garden will soon be as wild as my kids hair! As all the new little seeds are popping up I am starting to see all the bare patches of garden. I just want to fill them with something, anything. Hubby wants to leave it so it all looks neat and organised. We have very different ideas about how our garden should grow.....I wonder who will win out?

My Grandmother's beautiful Jacaranda tree (and pool) that we cant wait to visit on the holidays.

More of my grandmother's beautiful spring blossoms. I love visiting her garden.

In case you haven't heard yet, Christmas is only 51 sleeps away. I am really looking forward to the holiday season for so many reasons. The biggest and best is Hubby is taking 4 whole weeks off!!! In that time we will make a trip to QLD to see all my family and some of his. The kids are constantly asking me to go up there not understanding that its not just 'around the corner', but now they have something to look forward to and I can say yes we can and receive squeals of excitement in return. My grandmother's beautifully established and flourishing garden is always a treasure to see (and raid) and the kidlets spend most of the day in the pool and either running away from or with Jasper the dog. The rest of the year will be over before I know it. My mum used to say "there aren't enough hours in a day" and I used to wonder what on earth she would think that for - I'm sooo bored (thought 13 year old me), now I totally get it and hear myself thinking that all the time!

Sunday, 1 November 2015

Making Soap

 Soap for me was not as hard as I first thought.....But then I hadn't really thought about making my own soap until I read about in Down to Earth by Rhonda Hetzel and now I have made it twice. It takes me longer than usual because I mix it by hand with a whisk as I don't have a stick blender (yet), nevertheless making soap feels so right to make and then eventually use. A word of caution first when making soap - if it is your first time (or anytime after if you prefer) use protective equipment as you are working with caustic soda and it will burn your skin if it comes into contact with it. I am lead to believe soap cannot be made without it, though I haven't looked into in too much yet as I am quite happy with my first results.


Soap essentials.

Items you will need:

Safety equipment:
  • latex gloves
  • goggles/eye protection
  • mask
Soap ingredients:
  • 460g olive oil
  • 600g rice bran oil
  • 440g coconut oil
  • 570ml rainwater/filtered water
  • 230g caustic soda
  • essential oil for fragrance (optional)
Soap making equipment:
  • lined baking trays, soap moulds or any other non-aluminium container that will allow you to set and shape the soap
  • glass measuring jug
  • pot
  • mixing bowl (non aluminium)
  • whisk or stick blender (don't use electric beaters as it splashes)
  • scales
  • sharp knife
  • drying rack

Measure ingredients accurately.

Making soap:

  • Ensure the room you are working in has good ventilation. Put on your safety equipment and cover your work space with newspaper for protection.
  • Grease your moulds - spray oils works great, or use ordinary oil and paper towel and wipe over.
  • Weigh your oils and warm in a pot until temp reaches around 50 degrees Celsius.
  • Measure caustic soda and water, carefully adding caustic soda to water and not the other way around. This will heat up very quickly and fumes are created. Mix until dissolved.

Caustic soda when combined with water gets very hot.
Cooling the oils and caustic soda on a window sill.

  • Once oils and caustic soda mixture are between 45 -50 degrees Celsius carefully add caustic soda into the oils and start to whisk/blend. If you are using a stick blender it should only take about 10-15 minutes, however I used a whisk and spent at least 30 minutes whisking. A great workout for the forearms I can tell you that!

Oils combined to caustic soda looks smooth and creamy.
    Mixture at 'trace'.

  • When ripples begin to form on the surface and stay there you have reached a point called 'trace' and this means the soap has become stable and ready to pour into moulds. Caustics soda is mostly gone by this point too.

Coconut shreds from Hubby's coconut cream making added in an attempt create an exfoliating soap bar.

  • If you wish to add fragrance or anything else like flower petals or coconut granules (like I did in this attempt) do so now.
  • Pour into tray or moulds and allow to cool. Leave somewhere to set slightly for about 12-24 hours.

Soap poured into trays to set.

  • Take soap from moulds and cut up into desired shape with a sharp knife and place on a drying rack.
  • Leave to cure and harden for 4-6 weeks depending on size. Turn the soap every other day so they dry out evenly. The drier they are when you use them, the longer they will last.
Soap cut up ready to dry out.

And that's basically all there is to it. There are plenty of other recipes out there and I think every time I make soap I will try something a little different. Make sure if you are creating your own recipe you have the right oil to caustic soda ratio right otherwise it wont work. There are lots of soap calculators out there, but I haven't used any yet so feel free to let me know which ones are the best to use. I will also share when I find great recipes and the sorts with you too! Have fun and let me know how it goes when you try it.

LinkWithin

Related Posts Plugin for WordPress, Blogger...